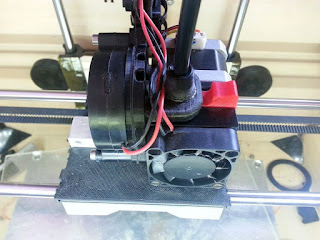
I own a CTC Dual 3d printer and do not use the second extruder for more than to do some first tests, the second extruder and and the extra wires only cause troubles when maintenance and unnecesary mass to move causing more vibrations and lower quality prints.
...So i decide to remove my second extruder and use the extra carriage space for adding an active cooling system for better results, mainly when ABS small parts or PLA parts are produced.
After testing many available designs, none of them work as expected... some are out of carriage space touching the frame, some not cooling well, some are hard to print...
Finally i designed my own system based on the blower fans, i think they are a better solution producing a more concentrated air flow over the exact point.
This design now has been tested and fixed for some months with excelent results. Not sure but should be valid for other Makerbot Replicator clones/based printers, so please, report your results.
BOM:
-3D printed parts (Reccomended ABS 40% infill) Check here
-1 X 5015 blower fan (24v)
-2 X M3x25 bolt
-2 X M3x12 bolt
-2 X M3 nut
-2 X Zip ties
I reccomend to use this exact fan model, it is cheap and works fine. I bought from Ebay, i reccomend this "exact" model due to other brands can have slighty different dimension and may need some mods for fitting.
Assembling:
-First you need to remove the left extruder from your printer, i recommend to remove also the wires from the not used stepper, heater cardgine and temperature sensor (remove from the MigthyBoard and carriage), but leave the second fan wires, it will be used for powering the new blower fan.
Without these "extra" wires you will have a more clean and accesible head for maintenance and a lower number of parts supceptibles of fail.
-Now clean the printed parts, make sure the blower fan fits perfect on the adaptor and press the two nuts on the provided slots of the main body:
 |
| nuts pressed |
-Glue the blower adaptor to the duct part and the PTFE tube adaptor to the main body, you can use acetone if your parts are ABS.
Note the tube adapter is designed for fitting a 6mm PTFE tube, if you use a different external diameter tube you can create your own adapter and glue it in place.
 |
| blower adaptor glued |
 |
| 6mm PTFE tube adaptor glued |
-Assemble parts as pictured using the two M3X25 bolts.
Note the 2.5mm spacer on the lower bolt for preventing the bolt touching the extruder (you can cut one of the the M3X25 bolt 2.5mm instead of use the spacer).
-Assemble the fan block to the extruder block tightening the M3X12 bolts and secure wires using the zip ties.
 |
| Whole block |
 |
| Zip ties |
-Note the added black sheet, this is another small mod for improve the heating time by preventing the stepper fan air go to the nozzle tip. Check here.
Powering:
There are two ways:
You can add a simple switch between the power supply and cooling fan and turn it ON/OFF manually when needed.
Or the best solution is control the fan with the MightyBoard and use the standard GCODE commands for turning it ON/OFF automaticaly.
Depending of your MightyBoard, you may need to do a mod by adding a mosfet and/or a two way connector, these parts are missing on most boards and pads are exposed as "Q6" for the MOSFET transistor (PSMN7R0-30YL) and "EXTRA" label for the connector.
After modded/checked connect the old second extruder fan wires to the blower fan by one side and to the two way "EXTRA" connector by the another (take care polarity).
Check this for a picture from "thrit00" Thingiverse user delailed mod: Picture
Tags: Makerbot, Flashforge, Replicator, CTC, Duplicator 4, 4X, Wanhao, FF3DP, Dual, Bizer


Thank you for this guide! :)
ResponderEliminar